Undermount Sink
Over the years we have found that attaching an undermount type sink to the soapstone can be difficult. We know of no history of soapstone having problems being drilled for screw holes, and/or glued to attach an undermount sink. Still, given the weight of the sink plus the addition of water, we feel the best way to give the sink 100% support and keep unnecessary tension off the soapstone is to install the sink as follows:
Installation Guide
1 Your soapstone countertop does not need a sub-base when using 1-1/4″ thick material. When installing a undermounted sink you want to build up the cabinet the sink is going to rest in. Start by cutting a piece of 3/4″ plywood to the inside dimensions of the cabinet the sink will rest in. You will also need to add support for the plywood, 2×4’s work well.
2 Measure the thickness of the lip of the sink. This is the deapth you want to the top the plywood to set from the top of the cabinet. When finished installing you want the top of the sink to be flush with the top of the cabinet.
3 Next, you need prepare a cut-out of the sink in the plywood. In most new sinks a template should be provided. It is not a bad idea to over cut by about 1/4″. This will allow you some room for adjusting the sink to the stone cut out. Once the cut out is done in the plywood, set your sink and check to see that it is flush with the top of the cabinets (a fraction lower is ok).
4 Important! If we are shipping you a piece of soapstone with a sink cut-out already done we suggest you wait until the stone arrives and trace the cut-out area onto the plywood, this will guarantee a match of top-to-sink position.
5 After dry fitting the soapstone to check alignment, run a bead of caulk sealer (we prefer Phenoseal) around the top edge of the sink that will be covered by the soapstone. Install the soapstone and cleanup any overflow of sealer. Here’s a tip, we suggest if it is possible that you attach your faucet to the soapstone before installing the sink section, if anything, it will make life a little easier for the plumber.
Now that the undermount sink has 100% support your mission is complete and the soapstone is feeling no unnecessary tension.
Contact us about your next soapstone project, to receive a brochure, or to request an estimate.
1
2 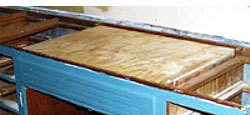
3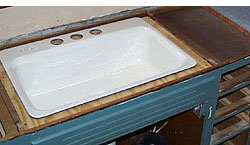
4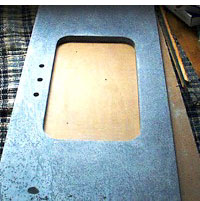
5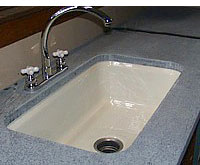
Ready to Talk?
DO YOU HAVE A BIG IDEA WE CAN HELP WITH?